4146 views
owned this note
# CS200 Python Stencil Setup Guide
This guide contains instructions for downloading and running Python stencil code in VSCode. You can use this process to load example Python code posted for a lecture, or to get started with homeworks/projects/labs in Python.
# **Before you start**
This guide assumes that you have set up VSCode, Python, and Git on your system, which was part of HW0. If you have not done so already, follow the steps in the [**VSCode Setup Guide**](https://docs.cs200.io/s/vscode-python-setup-guide) to do this.
# **Downloading your code**
First, you should clone or download the stencil code we have provided. This process is exactly the same as with our Java stencil code:
There are two ways we might give you code to run on your system:
- For **HW0, lecture code, or other examples**, we will directly provide a direct **Github Repository URL** (eg. `https://github.com/something>`). To use these, see the instructions in **“[Cloning from a Repository URL](https://docs.cs200.io/s/github-guide#Cloning-a-repository-by-URL)”** from the Github guide.
- For most **Homework/Project/Lab stencils**, we will give you a **Github Classroom link** (eg. `https://classroom.github.com/<something>`). To use these, you should clone your repository by following the instructions in “[**Accepting an Assignment on Github Classroom**](https://docs.cs200.io/s/github-guide#Accepting-an-Assignment-on-GitHub-Classroom)” from the Github guide.
# **Opening a Stencil in VSCode**
Once you have downloaded or cloned your code, you can open and start using it with VSCode as follows:
1. Open VSCode and go to **File > Open Folder** and browse to the folder you cloned in the previous step. Select the folder and click **Open**.
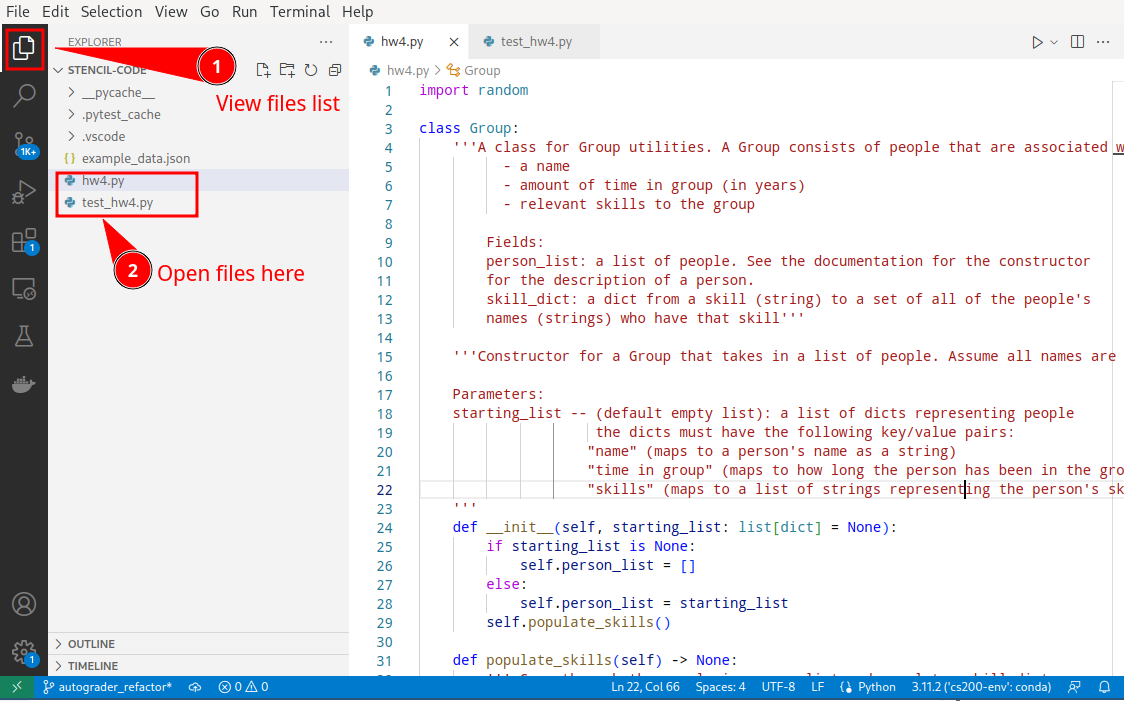
2. If VSCode displays a warning about security settings, click **“Trust Project”** to allow VSCode to load the code. From there, you should be able to see VSCode’s main window and open files, which looks like this:
3. When downloading a stencil, the first step is to make sure it’s set up correctly. To do this, open up any `.py` file–we’ll use this to test VSCode’s settings and make sure it’s configured to run Python correctly in the next step.
## First time setup (for each assignment/project)
Python projects often import lots of external libraries called *packages* that contain powerful features and make it easy to get started. If the stencil you are configuring needs external libraries, we need to perform an extra setup step.
To do this:
1. Look at the files in your stencil project. If you see a `requirements.txt` file this stencil needs additional libraries, keep reading.
2. If you do **not** see a `requirements.txt` file, skip to [Running tests](#Running-tests).
### Setting up your environment
Before we can run our code, we need to configure VSCode so it finds the correct Python version and loads any libraries we need for this project.
To do this:
1. In VSCode, press **Ctrl+Shift+P** (or **Command+Shift+P** on a Mac) to open the **Command Palette**. This is a big menu of all the actions VSCode can do.
2. Start typing and select the option **Python: Create Environment**, which should look like this:

3. In the next menu, select 'Venv' to make a virtual environment. This is like a folder to hold all the libraries used by this project:

4. If you get a menu to select a Python version pick **version 3.10.X** (where X can be anything).
<!--  -->
:::danger
**Note:** For this iteration of the class we are using version **3.10**, even though Python versions above this exist.
:::
5. If your project has a `requirements.txt` file, check the box next to `requirements.txt`, which tells Python to load the libraries, then click **OK**. (If your project doesn't have a `requirements.txt` file, you can skip this step.)

6. VSCode should now start building the virtual environment for this project. This may take a few seconds--you should see in the bottom-right corner informing you of its status.
7. When it's done, your interpreter should be set up! Continue to the next section to verify it's working.
### Checking your interpreter settings
Once you set up your environment--and **each time you open this project** in VSCode from now on--you should see the bottom-right corner of VSCode should show **`.venv`**, which indicates it's using the virtual environment:

:::danger
:rotating_light::rotating_light::rotating_light: **Every time you open VSCode, always check this setting first** to make sure VSCode is using the virtual environment.
If you don't see it, try **[setting up your environment again](#Setting-up-your-environment)** or feel free to ask for help on Ed. Otherwise, you won't be able to run your code!
:::
## Running tests
Next, we’ll run some tests present in this project. To do this:
1. Open the testing panel by clicking on the beaker in the sidebar, which looks like this:

2. VSCode should automatically detect a set of tests in your project and your testing pane should look like the picture below. If not, see [this section](#If-you-need-it-Configuring-your-tests-manually) to configure your tests.
3. Once you are able to see your tests, click the **“Run tests”** button to run them!

If the tests all pass (all have green checkmarks) and your testing pane looks like the figure below, you are good to go! Yay!

You should be able to start writing code and running tests. For more information, please check out the following resources:
- [**Our Python testing guide**](https://cs200.github.io/s/python-testing-guide) for instructions on how to run and debug tests
- [**Annotated diagrams on VSCode’s features**](https://brown-csci0200.github.io/assets/lectures/23python1/Lec25_whiteboard_f22.pdf): from the Intro to Python lectures
- [****Our Java to Python guide****](https://docs.google.com/document/d/1wwOL1PsgdfeAzv77m6iBNzwX0m9HV5i_nJoKKZad_tY/edit?usp=sharing)
### If you need it: Configuring your tests manually
If you have not run tests in this project before, you may be asked to set your testing configuration, which tells VSCode where the tests are located. If this occurs, follow these steps:
1. Click “**Configure Python Tests”**:

2. A menu will open at the top of the VSCode window like the picture below–in this menu, select “**pytest**”:

3. Next, you will be prompted to select a location for the tests. Select **“. Root Directory”**:

4. If you are are asked for a testing file prefix, select **files starting with `test_`**.
5. Next, you should see a list of tests and be able to run them per [these instructions](#Running-tests). If you don't see a list of tests, see [Troubleshooting](#Troubleshooting).
## **When you need it: Running Python from a terminal**
Normally, VSCode can run Python for you, just like how IntelliJ would run your Java code. However, for some assignments–or perhaps for debugging–you may need to run Python directly from a terminal. Here’s how:
1. In the VSCode menu, open a new terminal with **Terminal > New Terminal**
2. Your terminal should automatically be setup with VSCode’s python configuration–you should see `(.venv)` at the start of your terminal prompt, like the figure below:\
If you terminal does not start with `(.venv)`, run the following command to set it up: \
`source .venv/bin/activate` Your terminal should now look like this:

3. Your terminal is now ready to run Python directly! To run a Python file, you should run the command:
`python some_file.py`\
**OR** (if your terminal complains python isn’t found)
`python3 some_file.py`\
where `some_file.py` is the name of the file you want to run.
Python will then check the file’s syntax and then run the file line-by-line until it completes or encounters an error–-any errors, or output (like print statements) will be printed to the terminal.
***
_Please let us know if you find any mistakes, inconsistencies, or confusing language in this or any other CSCI0200 document by filling out the_ [_anonymous feedback form_](https://forms.gle/8HY7tDdgM98fk2e19)_._
# Troubleshooting
In this section, we’ve listed the most common errors we’ve experienced and some fixes. If you run into issues, please check this section first!
### Most common issues
For any issue, please make sure you check the following items first:
- Make sure you have opened your project in VSCode (using **File>Open Folder...**) by opening the *folder that you cloned for this project* (not your CS200 folder, or any other folder). For hw0, this is the `hw00-setup` folder.
- Make sure your **[interpreter is set correctly](#Checking-your-interpreter-settings)** (should say `.venv` in the bottom right corner)
- Make sure **all** of the python files in your project are **free of syntax errors** (red underlines). VSCode needs to run your Python code to make many features work (eg. if **any** file has an error in it, your tests won't show up!)
### `No module named ...`
This means that python can't find a library needed by our project. Try each of the following steps, in order:
1. Check the [most common issues](#Most-common-issues), particularly that you have VSCode open to your stencil directory and that your interpreter is set correctly. For debugging this error, you can ignore problems causing red underlines in VSCode for now (these are more likely a symptom than the actual problem).
1. (MacOS only) In the VSCode menu, select **View** → **Command Palette**. In the menu that opens, type “user settings” and click “Preferences: Open User Settings” from the options that come up. In the user settings search box, type “`terminal.integrated.inheritEnv`” and uncheck the checkbox, which should look like this:

2. Restart VSCode and try again
3. If you still have issues, try [rebuilding your environment](#Rebuilding-your-environment).
If you still have errors finding modules after this, please post on Ed or feel free to come to hours.
<!-- 2. (on all systems) run `conda deactivate` **_twice_** (or until running `conda info` shows that the active environment is None) and then `conda activate cs200-env`
- (on all systems) after doing the above steps, try the python command above again. Also try running `python3 image_lib.py –-text 'REPLACE THIS WITH YOUR OWN TEXT'` instead -->
<!--If none of that works, follow the [advanced ](https://docs.google.com/document/d/1ftFKMe5o91Izv9zunA5iMLjuNjnEjk1FIyRoOFl4UAU/edit#heading=h.pi0l32zezfft)instructions below. -->
:::info
**Note**: If you search for help online, know that you should **NOT** be trying to install anything via `pip` to resolve this issue--this is more likely to cause different problems later. Please post on Ed if this troubleshooting doesn’t work.
:::
### If Pytest doesn’t find your tests
If pytest fails to show your tests, try the following:
1. Check the [most common issues](#Most-common-issues), particularly that you have VSCode open to your stencil directory and that your interpreter is set correctly
2. Make sure that *all* of your `.py` files are free of syntax errors (red underline), which usually causes pytest's test detection to fail.
3. If you're not sure how to find or fix the error, try to [run your test file from the terminal](#When-you-need-it-Running-Python-from-a-terminal), which is a good way to get a log of the error that may help. (VSCode's build log (**View>Output**) may have information about the error.)
5. After fixing any errors, click **“Refresh Tests”** on the top of the testing pane, which looks like this:

5. If you still don't see any tests, try [rebuilding your environment](#Rebuilding-your-environment).
If you still have issues with test detection, please feel free to post on Ed or come to hours.
### Rebuilding your environment
If something goes wrong with your Python environment, you can rebuild it and create it from scratch. Here's how to do it:
1. Look at the files in your VSCode project, which should look something like this:

3. If you see any folders named `__pycache__`, `.pytest_cache`, or `.venv`, **delete them**. This removes any VSCode/Python settings or state that might be broken.
4. Close and reopen VSCode. Be sure to open VSCode directly to the folder that holds your stencil project (ie, `hw00-setup`).
5. Set up your environment again using [these instructions](#Setting-up-your-environment).
If you still have problems building your environment, please feel free to post on Ed or come to hours.
***
<!--
# **Advanced troubleshooting for image\_lib.py**
**Follow these instructions only if the basic troubleshooting did not help**
Open the file called `hello_world.py` and open a new terminal. Make sure the cs200-env is activated in the terminal (run `conda activate cs200-env` if not)

Run hello\_world.py using the “play” button near the top-right of the VSCode window:

The terminal should have the command that was used to run this file. Replace the end of the command (the path to the hello\_world.py file) with the `image_lib.py --text 'REPLACE THIS WITH YOUR OWN TEXT'` , keeping the beginning (what is called the path to the Python interpreter) the same.

If this works, it is a way that you can run files in the terminal using the correct Python installation that is in the conda environment.
TODO: For now, see [here](https://docs.cs200.io/vscode-python-setup-guide#Troubleshooting).
-->
<!--
### Configuring your Interpreter
:::danger
**_Note: Do not skip this step._** You’ll need to do this step for each stencil you open. Every time you open VSCode, you should check that this setting is set correctly, since it can sometimes lose the settings. You won’t be able to run any tests if this setting is incorrect!
:::
4. Look in the bottom-right corner of VSCode’s window for a version number of the form 3.x, (eg. 3.9), like the figure below, and **click on it**. This setting shows the interpreter VSCode is using, which denotes a specific version and configuration of Python.

5. This should open up a menu in the top part of VSCode listing the Python interpreters VSCode knows about–**select the one labeled cs200-env**, which is the version you configured for this course in HW0, like this:
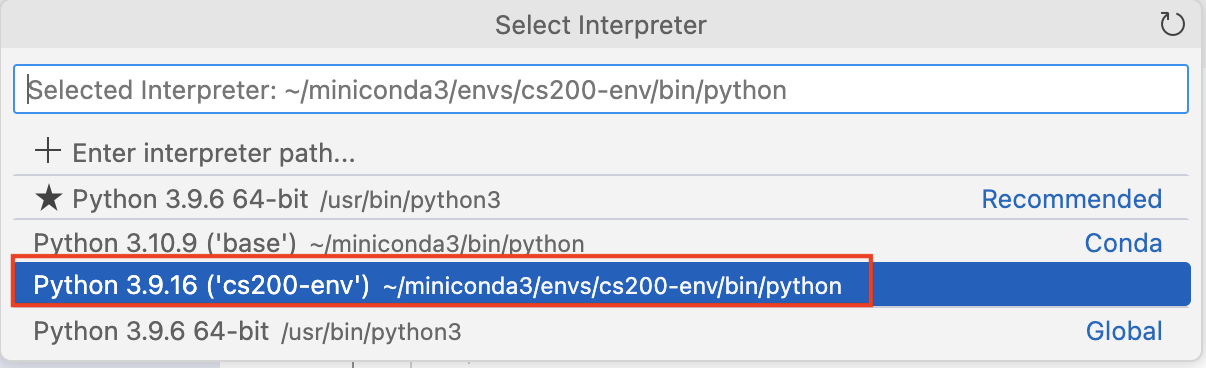
If you do not have an entry in this menu labeled cs200-env, make sure you have [Configured conda](https://docs.google.com/document/d/1ftFKMe5o91Izv9zunA5iMLjuNjnEjk1FIyRoOFl4UAU/edit#bookmark=id.24ctnkvy61ws) per the[ VSCode setup guide](https://docs.google.com/document/u/0/d/1ftFKMe5o91Izv9zunA5iMLjuNjnEjk1FIyRoOFl4UAU/edit)–if you have issues with this, see [this section](https://docs.google.com/document/d/1ftFKMe5o91Izv9zunA5iMLjuNjnEjk1FIyRoOFl4UAU/edit#bookmark=id.nk5c0io5bgcg) of the VSCode Setup guide and feel free to ask for help on Ed or in Hours if you get stuck.
6. When you are done, the bottom-right corner of VSCode should always include **“conda”** and **“cs200-env”**, like this:

This setting controls where VSCode looks for all the Python libraries we will need in our assignments. If you ever encounter errors like “python not found” or “Could not load module” **always check this setting first.**
-->